windows 7使用wifi网络时一旦远程桌面登录进来wifi连接立刻断开的问题


Creating User-Specific Wireless Connections
By default, when you connect to a wireless network and then elect to save the network (by activating the Save This Network check box after the connection has been made), Windows 7 makes the wireless connection available to all users of the computer. (That is, Windows 7 stores the wireless network connection in the computer's All Users profile, which is the profile that Windows 7 uses to make objects available to every user account on the computer.) This is usually the best way to go because it means you only have to make the connection to the wireless network once, and then the connection is set up for every user account.
Sometimes, however, you might not want other users to have access to a particular wireless network connection. For example, your neighbor might allow you to use his wireless network, but only on the condition that your kids not use the network.
For these kinds of situations, Windows 7 enables you to create user-specific wireless connections. This means that when a user connects to a wireless network, Windows 7 enables that user to save the wireless network connection in the user's profile. The other users on the computer will not see the connection.
Here are the steps to follow to activate Windows 7's user-specific profiles (or per-user profiles, as Windows 7 calls them) for wireless networks:
- Open the Manage Wireless Networks window, as described earlier.
- Select Profile Types in the taskbar. Windows 7 displays the Wireless Network Profile Type dialog box.
- Select the Use All-User and Per-User Profiles option.
- Click Save. Windows 7 puts the new setting into effect.
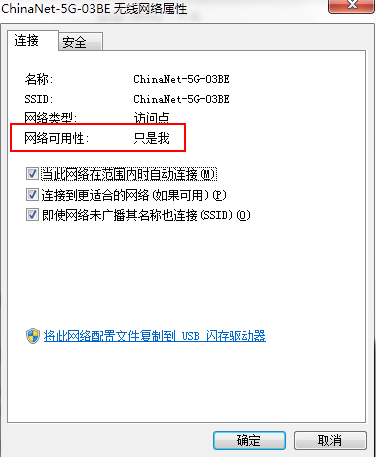
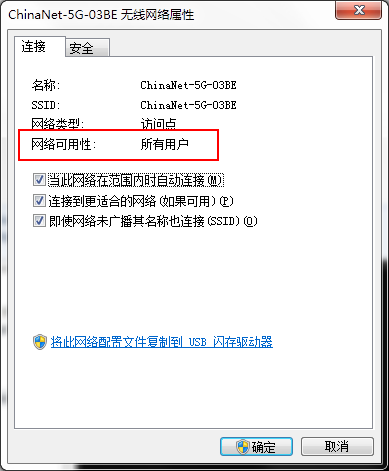
Now, when a user creates a wireless network connection, Windows 7 displays the dialog box, which gives the user three options:
- Save This Network for All Users of This Computer-The user selects this option to save the wireless network connection in the All Users profile, which means that every user account will have access to the wireless network.
- Save This Network for Me Only-The user selects this option to save the wireless network connection in the user's profile only. Other user accounts will not have access to the wireless network.
- Don't Save This Network-The user selects this option to bypass saving the network connection.
> netsh wlan show profiles
then, copy the name of the profile you want to make for all users, (drag the mouse over the text and hit enter to put it in the clipboard)
Now, export the WiFi profile with:
> netsh wlan export profile name="your copied Wifi Network name" folder="C:\path\" key=clear
After that, add it to all users:
> netsh wlan add profile filename="full path of .xml file" user=all